Recommended Process For Product Settings Bulk Upload
- Do you have 1,000’s of products and dread having to use the SellerLegend User Interface to tediously add product settings to each product individually?
- Fear not, help is at hand!
- Detailed instructions follow later, but here’s a short summary of the process we suggest you use to bulk-manage Product Settings:
- Select the Marketplace you want to work in (Product Settings bulk management needs to be repeated once per Marketplace)
- Download your Product Settings onto an Excel spreadsheet using the specialized Reports Button provided
- Please follow the steps to download the product settings file.
- STEP 1: Click on the Reports button.
- Please follow the steps to download the product settings file.

-
-
-
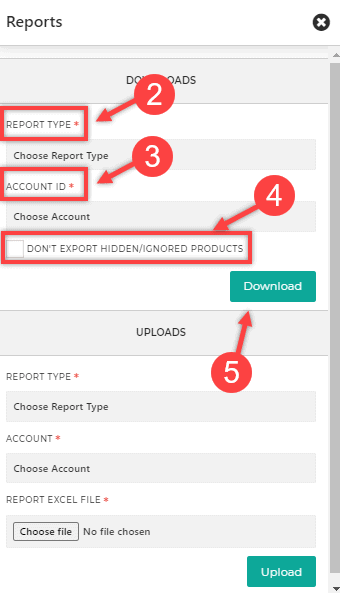
- STEP 2: On the resulting panel, select the report type, from the downloads section, which here, in this case, is PRODUCT SETTINGS
- STEP 3: Choose the account for which you want to download and edit the product settings for
- STEP 4: Check the box if you do not want to include hidden/ignored products.
- STEP 5: Click on the download button.
-
-
-
- Open the downloaded file in Excel or other application which can read and update Excel files
- Observe the sequence and structure of the downloaded file and read the rest of this article to gain a better understanding
- In Excel or alike, amend/add/delete the Product Settings entries for any product you wish to update
- Upload your modified Product Settings Excel file onto SellerLegend using the specialized Reports Button provided
- Please follow the steps to download the product settings file.
- STEP 1: Click on the Reports button.
- Please follow the steps to download the product settings file.
-
-
-
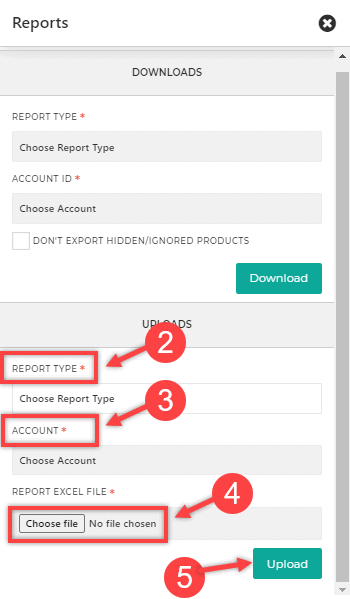
- STEP 2: On the resulting panel, select the report type from the uploads section, which here, in this case, is PRODUCT SETTINGS
- STEP 3: Choose the account for which you want to upload the file
- STEP 4: Choose the file you want to upload
- STEP 5: Click on the upload button
-
-
-
- Check for Upload error messages, if any
- Correct the errors in the Excel file
- Repeat the last 3 steps above (Upload, Check, Correct) until the Product Settings upload is accepted without any errors
- Spot check the outcome by verifying on SellerLegend a sample of the products you modified with the bulk Product Settings management process
The Bulk Upload Excel File Format And Rules
- You now know we will be using an Excel file to manage Product Settings. Let’s get the file format and rules explained first.
- Do not attempt to follow this discussion unless you have mastered how Product Settings works in SellerLegend.
- Please read the following articles first and familiarize yourself with the Product Settings management in SellerLegend
- The Excel File Fields
- Every row of the Excel file must respect the following format
- The Excel file format includes the Product SKU field from the Cost-Of-Goods Period as well as fields from the Cost Element
| Field | Excel File Header Title | Notes |
| Product SKU | product_sku | Mandatory – must be an existing SKU |
| Product ASIN | asin | Optional – for reference only, not used |
| Product Internal Name | internal-name | Optional – Will create an Internal Name if none exists |
| Product Group | product_group | Optional – Will create a Product Group if none exists |
| Tags | tags | Optional – Will create a Tag if none exists. Multiple tags can be separated by a comma |
| Stockout Notification Flag | notify_stockout | Optional – 1 = notify, 0 = do not notify |
| Non-Sellable Returns Notification | accept_returns | Optional – 1 = notify, 0 = do not notify |
| Hide Product | hide | Optional – 1 = hide, 0 = do not hide |
| Stockout Alert Days | alert_days | Mandatory – a positive integer number |
| Stockout Alert Units | alert_units | Mandatory – a positive integer number |
| Restock Lead Time | restock_lead_time | Mandatory – a positive integer number |
| Stock Days Of Cover | days_of_cover | Mandatory – a positive integer number |
| Safety Days | safety_days | Mandatory – a positive integer number |
| Minimum Order Quantity | moq | Mandatory – a positive integer number |
| Number Of Units In Transit | in_transit | Mandatory – a positive integer number |
| Number of Units In Warehouse | in-warehouse-qty | Mandatory – a positive integer number |
| Crate Quantity in Units | crate_quantity | Mandatory – a positive integer number |
| Sales Velocity Used To Calculate Reorder Date/Quantity | sale_velocity_days | Mandatory – A value from the following list: 7_days, 14_days, 30_days, 90_days, 180_days, 360_days |
| Crate Quantity Behaviour | crate_behaviour | Mandatory – A value from the following list: Round up, Round down |
| Discount Threshold Percentage | discount_threshold | Mandatory – a decimal number expressing a percentage: for example 0.5 = 50% |
| Order Excessive Quantity Threshold | excessive_quantity_threshold | Mandatory – a currency amount |
| Natural Daily Sales Velocity | natural_daily_sales_velocity | Mandatory – a decimal number, e.g. 12.34 |
| FBM Shipping Cost | shipping_cost | Optional – a currency amount |
| Miscellaneous Cost | miscellaneous_costs | Optional – a currency amount |
| Internal Price | Internal Price | Optional – a currency amount |
- The Excel File Rules
- Upon download, the file will contain the current settings values for each of your products
- If this is the first time you download the product settings file, the settings will show the default values for each setting
- All your products will be included in the Excel file, including Hidden Products and Inactive Products
- When new products are added, a new row will materialize in the spreadsheet to reflect the newly added product
- The Excel file must have a header row with the column titles as per the above table
Product Settings Bulk Upload Process Details
- Read the following articles and familiarize yourself with the Product Settings management in SellerLegend
- Once you understand how Product Settings works, select the Marketplace you want to manage Product Settings for from the Marketplace Selector
- Go to the menu and select Products –> Products list
- Click on the Report Button (Refer to the screenshots above)
- Under the download section of the resulting panel, choose the account you wish to Download Product Settings for
- Check the dialogue box if you don’t want to download hidden/ignored products.
- Click on the Download button
- You will see a popup screen saying ‘A Request Has Been Submitted’
- On the Menu, click on Reports –> Downloaded Reports
- In the resulting list of reports, locate the report type Product Settings with the Request Made date corresponding to the time you requested the download which matches the file name which you have just uploaded
- When the Status column shows DONE, click on the blue Download button
- This will produce an Excel file with all your products and their current Product Settings
- Open the file in Excel, or any other software you use
- Amend the Product Settings details in the file according to your needs
- Save the updated file.
- On the Menu, go back to Products –> Products List
- Click on the Reports (Refer to the screenshots above)
- Under the upload section choose the account you wish to Upload Product Settings for
- Choose the file you wish to upload
- Click on the Upload button
- Once the upload is completed, on the Menu, go to Reports –> Uploaded Reports
- Check the outcome of your upload:
- If the Request Completed column shows DONE, the Excel file was uploaded without errors
- If the Request Completed column shows DONE_WITH_WARNINGS the Excel file contained errors
- Click on the Download button and open the downloaded Excel file.
- Erroneous settings definitions will show in red. To find out why the data is erroneous, hover on each of the fields and the erroneous fields will show an Excel comment with the appropriate error message.
- Correct the errors in the Excel file you are viewing
- Once all errors have been corrected, save the Excel file
- Repeat the Upload process with the Excel file you have just saved
- Click on the Download button and open the downloaded Excel file.