(*) identifies features which are not yet available at the time of writing
How Do I Reorder Screen Columns?
How Do I Add My Own Content To Custom Columns? (*)
How to Get Here?
- Views Manager is available on every screen (Screenshot below)

What Are Screen Views?
- Screen Views are your personally customized column settings for any table screen in SellerLegend
- A Screen View defines which columns of a table screen are visible, and the order of the columns on the screen
- Creating new Screen Views is totally optional
- However, the use of Screen Views is recommended on crowded screens for easier data management and to minimize the need for the horizontal scroll on screens
- You can define as many different Screen Views as desired for any table screen
- Screen views are managed through a feature called the Views Manager
- The Views Manager is accessed by a downward arrow button to the right of any table screen’s name, called the Views Selector button
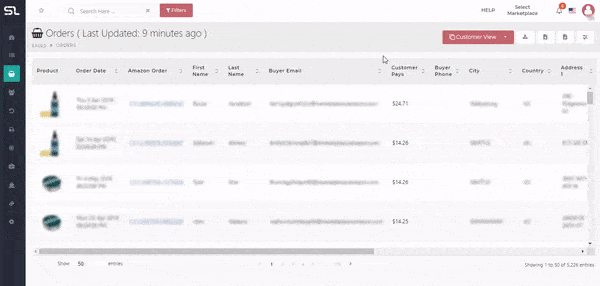
The Views Selector Button
- On Table Screens (but not on Dashboards) there is a red button to the right of the Screen Title
- This red button is called the Views Selector button
- If you have not yet created any new views, the Views Selector button name will be shown as “Default View”

- If you have created new views, however, the Views Selector button will show the name of the currently selected view

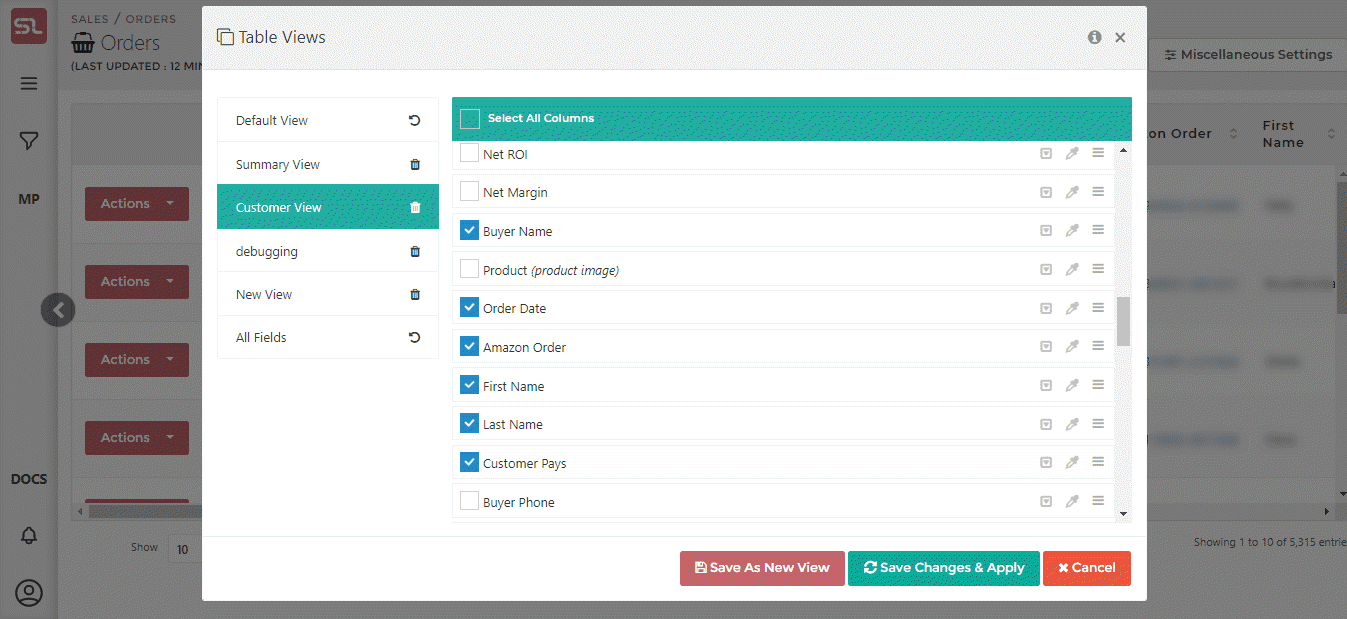
The Views Manager
- When clicking on the Views Selector button, the Views Manager screen appears (see below)
- The left pane of the Views Manager contains the list of defined views for the current screen
- Clicking on the view name will show the set-up of that particular view on the right pane
- You can then edit the view in the right pane by removing/adding columns in the view, reorganizing the order of the columns and assigning custom colors to the columns
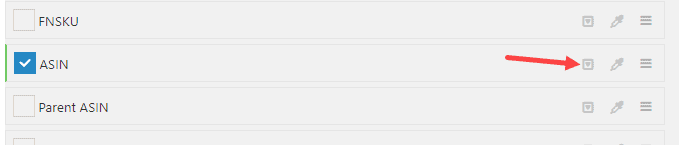
- The right pane of the Views Manager contains the names of all the columns available for the current screen
- The check mark to the left of the column name determines whether the column is shown (checked) or hidden (unchecked)
- The Colour Eye Dropper to the right of the column name allows the setting/resetting of the column colour highlight
- The Hamburger Menu icon allows the reordering of the respective column by drag-and-dropping the column name up or down the list
- The Save As New View button allows the creation of a new view based on the right pane choices. Clicking on that button will allow you to name the new view.
- The Save Changes And Apply will record any updates you apply to the right pane under the current view.
What Can I Do With The Views Manager?
- Using the Views Manager through the Views Selector button allows you to:
- Add or remove columns to a Screen View from a list of available columns for the specific screen
- Reorder the position of screen columns
- Highlight any column of a screen with your preferred color to draw attention to the column
- Conditionally highlight the content of any cell with your preferred color, depending on the value of the cell itself or the value of a different cell (*)
- Create a new Screen View with your choice of columns, choice of column positions and choice of column highlight color
- Edit an existing Screen View to add, remove and/or change the order of columns
- Delete existing Screen Views
- Create custom columns on any Table Screen (*)
- Add your own content to custom columns (*)
- Perform Logical/Arithmetic Operations On Custom Columns (*)
How Do I Check The Set-up Of An Existing Screen View?
- If the Views Selector button shows the name of the view you want to check, click on the Views Selector button
- If the Views Selector button does not yet show the name of the desired view,
- First, click on the drop-down arrow of the Views Selector button and select the view you want to check
- When the desired view name shows on the Views Selector button, click on the Views Selector button
- The Views Manager screen will then appear and you can check the setup details of the view
How Do I Create A New Screen View?
- Click on the Views Selector button
- The Views Manager screen will appear, showing the details of the current view
- Change the current view so that it reflects your desired setup
- Add or remove columns as desired (see How Do I Reveal/Hide Additional Screen Columns Below)
- Reorder the selected columns as desired (see How Do I Reorder Screen Columns below)
- Highlight one or more columns with your desired colors (see How Do I Highlight Columns below)
- Conditionally format one or more columns with your desired conditions and colors (*)
- Click on the Save As New View button
- Set the name of the new view and click on OK
- The new Screen View is created as defined and the screen reflects the columns as defined by the new Screen View
- The new Screen View name is added to the Views Selector button drop-down list
- The old view you used to define the new view on remains unaffected
How Do I Select A Screen View?
- Click on the drop-down arrow of the Views Selector button and select the desired Screen View from the drop-down list
- Upon selection of the desired Screen View, the screen will be updated to reflect the Screen View definition
- If there is no drop-down arrow in the Views Selector button, that means there is only one view defined, and that view is already shown on the screen
How Do I Reveal/Hide Additional Screen Columns?
- To reveal or hide columns on a screen, first, select the desired Screen View as described in How Do I Select A Screen View? above
- Click on the Views Selector button to reveal a drop-down list of all the available columns for the table screen you are viewing
- Ticking/Unticking the white box next to the column name will respectively show or hide the column from view on the table screen
- Once you have selected/deselected the columns of your choice, click on the green ‘Save Changes And Apply’ button
- The table screen will now refresh and show/hide the desired columns
- Note that even though a specific column may not be shown on the table, you can still filter on the content of a hidden column
How Do I Reorder Screen Columns?
- To reorder columns on a screen, first, select the desired Screen View as described in How Do I Select A Screen View? above
- Click on the Views Selector button to reveal a drop-down list of all the available columns for the table screen you are viewing
- Hover over the Hamburger menu icon to the right of the column you want to reposition
- The cursor will change to a crosshair cursor
- Drag and drop the column name up or down to the relative position you want for the column
- Once you have reordered all the columns according to your needs, click on the green ‘Save Changes And Apply’ button
- The table screen will now refresh and show the columns in their desired position
How Do I Set a Highlight to/Remove Highlight from Columns?
- To set a highlight color to a column,
- Click on the Views Selector button
- The right pane of the Views Manager screen shows the names of all defined columns for the Table Screen
- Click on the color eyedropper to the right of a column name
- A color selection dialogue appears where you can select your desired color for the column
- Click on the Select button to set the color
- Click on the green Save Changes and Apply button
- To remove a highlight color from a column
- Click on the Views Selector button
- The right pane of the Views Manager screen shows the names of all defined columns for the Table Screen
- Click on the color eyedropper to the right of a column name
- A color selection dialogue appears
- Click on the Reset button to remove the column highlight
- Click on the green Save Changes and Apply button
How Do I Update An Existing Screen View?
- To update an existing Screen View, first, select the desired Screen View as described in the “How Do I Select A Screen View?” section above
- Click on the Views Selector button to reveal a drop-down list of all the available columns for the table screen you are viewing
- Reveal/Hide columns as described in the “How Do I Reveal/Hide Additional Screen Columns?” section above
- Reorder columns as described in the “How Do I Reorder Screen Columns?” section above
- Set a column highlight/Remove a column highlight as described in the “How Do I Set a Highlight/Remove Highlight of Columns?” section above
How Do I Delete An Existing Screen View?
- To delete an existing Screen View, click on the Views Selector button
- The left pane of the Views Manager screen shows the names of all defined views for the Table Screen
- Click on the waste bin icon to the right of a view name to delete the corresponding view
How Do I Conditionally Format a Table Cell Based On Its Own Value or Another Cell’s Value?
- You can format any cell to appear a certain way based on either its own value or another cell’s value.
- This can be done on any screen with a table.
- To start with, please open up the View Manager and look for the column you want to format.
- Click on the dropdown icon (to the left of the eyedropper icon) against the column
- Click on the dropdown icon (to the left of the eyedropper icon) against the column
- Next, click on the box that says “Please Select” and choose the column that you want to be the basis for this column’s format. The “Please Select” text is replaced by the name of the column if one has been selected already. As an example, we are formatting the SKU column on the basis of the Profit column.
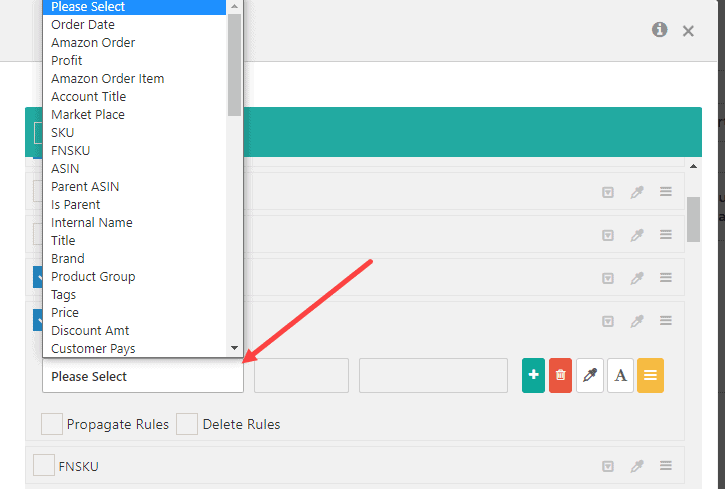
- Once you’ve selected a column, click on the box in the center to select a conditional operator. The number of operators you can choose will vary depending on the type of the column. Operators like greater than, between, etc. will be available for numeric and percent type columns. For columns like ASIN or SKU, products will appear automatically once you start typing in the the box. The third box may also disappear if a column like ASIN is selected.
- Click on the third box (if available) to add in the numeric/percent value that the operator will compare the value of the cell with.
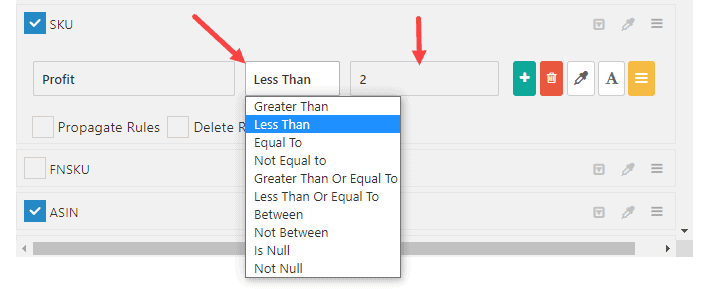
- In our example, we are formatting SKU based on the Profit column. All SKU cells where the Profit is Less Than 2 will be formatted.
- To set the color of the entire cell, click on the eyedropper icon to select the color.
- To set the color of the text only, click on the “A” text icon next to the eyedropper and select a color.
- If you have multiple format conditions, the one on top will have the most priority.
- To change priorities, click and press on the orange Hamburger icon to drag and drop the format rule above or below another.
- To add another condition, click on the green “+” icon. Rest of the process remains the same.
- If you want this conditional formatting to apply to ALL other views as well, check the Propagate Rules option.
- To delete the condition from just the current view, check the Delete Rules option. (this will only delete from the current view).
- To delete the condition from ALL views, check both Propagate Rules and Delete Rules options.
- Once done, save the changes so they can take effect.
How Do I Create Custom Columns On A Table Screen? (*)
- TBD – Tentatively Scheduled For End Of 2025
How Do I Add My Own Content To Custom Columns? (*)
- TBD – Tentatively Scheduled For End Of 2025
How Do I Perform Logical/Arithmetic Operations On Custom Columns (*)
- TBD – Tentatively Scheduled For End Of 2025