What Is Our Desired Outcome?
- What we want to do is to prepare a list of orders which have been refunded to the customer but have not yet been reimbursed to us
- Once we have the list of orders, we will want to go to SellerCentral and
- Preface the orders list with a polite case wording which says what we want Amazon to do
- Copy and paste the case wording and orders list into a support ticket and
- Ask the SellerCentral operative to review and reimburse
- However
- Do not send too many cases at once
- Amazon will take umbrage if you send them a very long list of orders in one single ticket
- If you submit an excessive number of order items per ticket, Amazon may say you are “Interfering with Amazon’s ability to help other sellers”, and you will be in their black book
- Use your common sense in choosing the number of items per ticket.
- A reasonable number would be 5, but you can risk going higher if you have many instances of reimbursements
- Avoid the appearance of automating the reimbursement process
- Amazon will take umbrage if your submissions show a pattern of failed reimbursement request which might point to an automated solution
- They will object against submissions of “insufficiently researched or prematurely submitted requests for reimbursement”
- Make sure you have double checked the eligible cases suggested by SellerLegend against all Amazon rules
- Do not send too many cases at once
- To mitigate the appearance of automation, we have implemented some features to reduce SellerLegend’s footprint
- Your first step will be to personalize the Refunds Manager Settings
Create Your Personal Settings
-
Please go to Refunds Manager -> Manage Refunds Reimbursements. And then click on refunds settings as shown in the screenshot below:

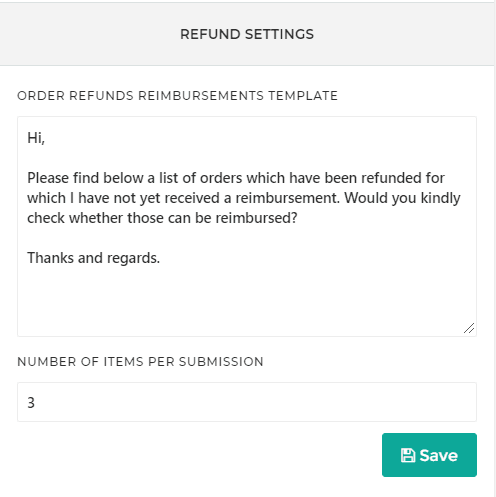
- Enter your own personalized case wording in the field Order Refunds Reimbursements Template
- Above all, make sure that your wording is congruent with the type of reimbursement you are claiming for
- If you are dealing with Returns Reimbursements, your case wording must reflect just that. Don’t say for example that you are claiming for damaged or lost inventory! (You would be surprised how many of you did during beta testing!!)
- Whatever you type in this box will be shown as the introductory text before the list of cases you are submitting for reimbursement
- In order to reduce the visible footprint, SellerLegend does not provide a default case wording.
- As every seller will use their own case wording, it reduces the appearance of over-automation.
- The case wording can be as short or as long as you wish and can be in any language you normally use for SellerCentral cases
- The case wording will typically say something along the lines of ‘here are some refunds which have not been reimbursed, please reimburse’
- Make sure your wording is less terse than the above, just use your literary imagination to make the wording polite and engaging!
- Above all, make sure that your wording is congruent with the type of reimbursement you are claiming for
- Enter you own personalized number of items per SellerCentral support ticket submission
- A ticket consists of the case wording, followed by several instances of eligible refund reimbursement instances
- The number of instances per ticket is determined by the value you enter in Number Of Items Per Submission field
Find And Double-Check Eligible Reimbursements
- Go to Refunds Manager -> Manage Refunds Reimbursements
- Untick all check boxes except the ELIGIBLE check box
- SellerLegend will show you a list of pre-checked orders which would be eligible for submission to Amazon
- Resist the urge to just tick all the eligible orders and use the Submit action!!
- Double check manually that each eligible order complies with the Amazon rules for reimbursement
- As we understand them, the rules are as follows;
- Orders with refunds older than 45 days AND not older than 18 months
- Orders which comply with the above rule must not
- Have been returned by the buyer and returned by Amazon to your inventory as a sellable unit
- Have been already reimbursed in cash or from Amazon’s holding account (reimbursed by inventory)
- Please satisfy yourself that the above rules are all which is required to qualify a refunded order for reimbursement
How To Sanity-Check A Refund
- Observe the Refund cycle
- How many units have been ordered (Units Ordered column)
- How many units have been refunded by Amazon to the buyer (QTY Refunded to Customer)
- Did the buyer send back any refunded items to an Amazon fulfillment Center (QTY Returned By Customer)
- Make sure that units refunded are not higher than units ordered
- Make sure the order did indeed get refunded (QTY Refunded to Customer is > 0)
- Observe the Reimbursement cycle
- Make sure the buyer-returned unit was not already returned to inventory (QTY Returned to inventory is 0)
- Make sure the unit has not already been reimbursed in cash or by inventory
- Clicking on the numbers in each column will automatically take you to Orders, Refunds or Reimbursements so that you can check the rules have been applied correctly
- Ascertain you are not dealing with a seller-refunded item
- These are NOT reimbursable by Amazon, as you have unilaterally decided to refund your customer
- Typically, you will have engaged with the customer via email to agree on the refund
- Therefore, click on the customer email address. This will take you to the SellerCentral Communications Centre and list all the emails which have been sent/received to/from that specific customer
- See if there is any evidence of you personally refunding the item. If so, do NOT select the item for submission. Rather, mark the item to be ignored.
Marking Orders As Ignored
- Some orders will appear as eligible but are not
- These are the orders which you will have refunded personally and told the customer he was not required to return the item
- These orders cannot be claimed for reimbursement
- Yet, because they exhibit all the characteristics of a reimbursable order, they are shown as Eligible
- It is your responsibility to mark these orders as Ignored so that they are never submitted to Amazon
- To mark orders as Ignored
- Click on the Eligible check box
- Click on the blue Actions button
- On the drop-down dialog, click on the red Ignore button
Marking Orders For Submission
- Once you are satisfied that you have truly eligible orders, you can click on as many Eligible check boxes as you wish to submit
- Click on the blue Actions button
- On the drop-down dialog, click on the blue Submit button
- And now, magic happens
- For every time you click on the Submit button, SellerLegend will generate one Submission Cases text file
- The text file will contain the case wording as defined in the Order Refunds Reimbursements Template in the Refunds Manager Settings, followed by as many eligible items as defined in the Number Of Items Per Submission in the Refunds Manager Settings
- SellerLegend will repeat the sequence of case wording followed by the next ‘n’ instances of eligible items until all selected eligible items are processed
- The result is several tickets worth of data in one file
- A File Reference number is assigned to each resulting file
- All eligible items which are contained in the file are tagged with the same File Reference number
- Important:
- Remember that SellerLegend does NOT automatically submit cases to Amazon
- It merely generates a file which you need to copy/paste into an Amazon case and submit manually
Retrieving The Submission Cases Files
- See a sample of a Reimbursements Case File as generated by the Manage Refunds Reimbursements function
- To download the cases file onto your machine,
- Click on any file reference number of any eligible order, OR
- Go to Reports -> Downloaded Reports
- Find the REFUNDS_SUBMITTED file with the desired reference number
- Click on Download
Submitting The Cases To Amazon
- Open any downloaded Submission Cases files
- Copy each case wording and their respective refunded orders in an Amazon ticket
- Submit the ticket
- Go to SellerCental and click on help
- Then go to Contact us > Selling on Amazon > Fulfilment by Amazon > FBA issue > Something else > email
- Copy and paste the data from the Refunds Reimbursements Manager into the email
- Experienced sellers are of the opinion that you should WAIT until a submitted ticket has been handled by Amazon before submitting the next ticket
If A Submitted Case Is Rejected By Amazon
- If an item is rejected because you manually refunded the buyer, you have no leg to stand on and Amazon are right to discard your request
- You should have done your due diligence as explained under How To Sanity-Check A Refund and should have ignored the item
- The item will still show a status of Submitted (Remember, SellerLegend does not communicate with SellerCentral for reimbursement requests)
- You can leave the status as Submitted if you wish, but it will not be recorded that Amazon have rejected that item
- In this case, it is advisable to manually change the item’s status from Submitted to Rejected, but SL does not insist on you recording the rejected status
- In any other rejection case, re-check the item, as Amazon are known to very ofter make mistakes
- The most common mistake is for the Amazon operative to look at a returned item and see it has been marked for reimbursement. He, therefore, assumes the item has been reimbursed and rejects the request, without checking that a reimbursement has indeed been sent.
- However, in many such cases, even when the returned item is marked for reimbursement, there is NO physical reimbursement to be found.
- If this is your case, then resubmit the item with a polite note to Amazon to say you have not received a reimbursement.